Sunday, November 25, 2012


Cam Bearing Tool (cont'd)

Went to the hardware store today and ended up with some size #131 o-rings.  They had 136's but I couldn't get the bearing on with both o-rings installed.  This size provides an ideal fit - not too tight but keeps the bearing from moving around.


Here's a shot of how it fits the block.  The wooden ball fits an adjacent bore and keeps the rod parallel with the bearing bore.  Works really well.


Also manned up today and carried the block downstairs into my basement so it could acclimate to room temperature for measuring main bearing bore sizes and crank journal sizes. 


ARP's on deck to install and check for o-o-R on the main journals.


I'll be assembling the shortblock downstairs so it's going to be a f*cking bear to get back upstairs once that's done.  With the crank, main caps, and pistons installed it's going to be the better part of 200 lbs.  Better start lifting heavy I guess haha.

Saturday, November 24, 2012

Cam Bearing Tool

I stopped up to my buddy Fazz's shop today for some help making the camshaft bearing tool.  It turned out really nice - many thanks again Fazz!  For some VW/Tool/Fab related insanity, check out his blog:  http://wrinklered.blogspot.com/.


O-ring glands cut - the size 137s I bought were a bit too big to be able to slide the bearings over them, I'm going to need to pick up a couple 136's.  So if anyone is in need of some #137 Buna-N o-rings let me know, I've got about 20 million of them.


Facing the bottom of the driver.


The Wizard himself at work


We actually ended up using an ole crusty 1" spade bit to hog the bulk of this hole out, then bored the rest of it to fit the steel rod.  Pretty sketchy but it worked pretty damn well. 


Finished, aside from the o-rings.  The fit on the wooden ball is really snug, which will help to keep the rod parallel with the bearing bores as I'm hammering the f*ck out of it.


And the best part.......it works!  No in action shots - no heat in my garage and it's 20 degrees outside.  Had a bit of difficulty on bore #3, as the OD of the shoulder was probably +0.020" of what it needed to be but a couple minutes on the bench grinder fixed that.  Aside from that little bit of rework, all the bearings came out in about 10 minutes.  For bores #4 and #5 the end of the rod was inside the block, so I fit a socket+extension of the end of it to add some reach for me to get a hammer on the end of it.


Cylinder Heads

I also finished porting/polishing the combustion chambers on the driver's side head and started leak checking and measuring chamber volumes.  First step is leveling everything up in two directions using my high precision digital level (lol).  


 Close enough.  No pics of additional progress because I discovered some leaks - had to do some more lapping / leak checking / lapping / leak checking / etc.  Chamber 7 finally sealed up and came out to be around 68 cc, bumping it up marginally from the stock volume of 66.67 cc.  I'm using a 60 cc syringe to measure out volumes, so it's not ultra precise.  Estimates to the +/-0.5cc is about as best as I can do.  More progress to come.

Tuesday, November 20, 2012

Got my camshaft bearing remover/installer today.  Some assembly required.


I've got an idea of the final dimensions but still have to review my tolerances.  But this is the general concept.  The idea of the wooden ball is that once it's drilled to fit the rod, it will help to keep the line of action parallel to the bore of the bearings by contacting the perimeter of an adjacent bore.  The idea of the o-rings is to prevent metal to metal contact between the OD of the driver and the bearing babitt material.


Universal bearing installers / removers were north of $200 bucks and got mixed reviews.  An LS1 specific tool I found was $90+shipping, and also got mixed reviews.  I got all the materials to make this tool for $35.  I hope to machine it this weekend - I'm borrowing some lathe time from a friend.

Sunday, November 18, 2012

A little more progress over the past few days/weeks/whatever.

Cylinder Heads

Finished the combustion chambers on one of the heads and polished the valves / valve seats.  I coated the sealing surface in layout fluid to serve as a visual aid for when I'm doing the final-stone on it prior to assembly.  For the time being I suppose it will also serve as mild protection from scratches/dings.


Bottom End

I also took the rotating assembly out of the motor to get a look at the main/rod bearings.  Wasn't too happy with what I found.


Lots of pitting here on the main bearings.


Uneven wear on these rod bearings:


Worn camshaft bearings:


Either the guy lied about the mileage of the engine or the owner didn't do so well with keeping up on oil changes.  The crankshaft journals look ok, no scratches that I can feel.  Depending on whether I can find a machine shop I might have them do a clean up polish to the journals.  I'll be replacing all the bearings and installing ARP hardware throughout.  As I'm doing this I'm going to also need to get the rods and mains honed to regain the roundness that is lost due to the increased clamping load.

I also took this opportunity to pull the block off the stand so I could regrease the pipe.  This will make the engine much easier to move around as I'm rebuilding it.


Got some new parts and tools in for the bottom end rebuild.  ARP hardware for the mains, rods, camshaft gear / retainer plate, and crank bolt.  Also new Clevite camshaft bearings, Red Line assembly lube, and ARP assembly lube.  New tools from JEGS are rod-bolt stretch gauge, micrometer set, and dial bore gauge.  These will aid me in checking my jounral clearances and runouts - I will be completely (re)blueprinting the engine, I don't want to take do all this work only to spin a bearing on startup or something.


More to come soon hopefully.  Still working on the heads and still have to finish the other valve cover.  Also need to get a camshaft bearing removal/installation tool and some other stuff.

Monday, November 5, 2012

Got another chamber done tonight.

Before.  Notice the shrouding around the intake valve and the texture in the casting.


During.  Shrouding blended out and bowl edges worked in.


Finished, after #220 wet sand and polish with a felt wheel on the dremel.  The aluminum mag polish seems to work pretty well.


Still to do on this one is clean up the valves and lap the valve seats.  I also tried out my flatstone on a section of the head, which is why it looks like a honed finish.  IPA alcohol seemed to keep the stone from clogging up - I tried water and it starting collection a lot of particles. 

My timing chain dampener also came today and I got that put together and mocked up.  The adapter plate is secured to the block with the bottom 3 bolts of the camshaft retainer plate, and has mounting bosses that the LS2 dampener presses and bolts onto.  The dampener is not compatible with the LS1 spacing, so I figured this was the best solution over drilling into the block or hacking up a damper and worrying about it coming apart.  I hope that it will help to alleviate any timing chain problems.


Sunday, November 4, 2012

Some more supplies came in late this past week and I was able to start work on the cylinder heads.

Some 3" carbide burrs and a porting kit from Eastwood.


I worked on the #8 combustion chamber, polishing the bulk of the casting texture out and blending the transition into the intake valve seat.  This required a very steady hand, with the sandpaper in some instances only a few tenths of a millimeter away from the valve seat, spinning away at a few thousand rpm.  I didn't bother to get all of the texture out, as any material removed is effectively reducing my compression ratio.  Following the sandpaper rolls on the die-grinder, I wet sanded by hand with #220 grit and then polished it to help reduce the rate of carbon build up.  As a final step I broke the edges of the bowl with some scotch-brite to help prevent detonation.  If there are burrs there they will heat up and act like glow plugs.


In this photo you can faintly see the outline of where that casting ridge surrounding the intake valve was. 


I also took some time to clean up the valves a bit - I polished the front and back sides of them and also lapped the valve seats.  The exhaust valve took a good bit of work as the seat was pretty pitted from the temperatures it sees.  But You can see the freshly cut surface where the intake valve contacts the seat - should provide me with a good seal.  I filled the chamber briefly with water and didn't have any leaks, so I'm not expecting problems.  I will do a more thorough test when all cylinders are done to verify that all chamber volumes are close to each other and that I don't have any leaking valves.


One down, 7 to go.  Then on to the exhaust and intake ports.  I'm not expecting the others to take as long now that I have an idea of how to do it.

Wednesday, October 31, 2012

A little more progress over the past few days - got the springs out of the heads and did the Comp Cam Rocker Trunion upgrade to the rocker arms.

But first, a few new arrivals.  Layout fluid and a 150/320 grit aluminum carbide / silicon carbide stone for when I eventually get around to leveling all critical surfaces on the heads / block, and a TrickFlow spring compressor from Summit Racing for removing the valves from the heads.

  
Valve Spring Removal:

Really straight forward.  Install compressor.  Compress springs.  Remove valve stem locks.  Uncompress springs.  Remove tool.  Remove springs.  Remove valves.  Repeat.  Estimated completion time for both heads:  ~15 minutes.  I really hated spending $70 for the tool to do this job, but I would have really hated trying to rig up another way to do it.  Provided that some tools are north of $200 bucks, I feel like I (kind of) won.


Rocker arms:

To get the old bearings/trunion out, I simply set the rocker on a 22 mm socket and pounded out the trunion with a hammer and punch.  Literally took maybe 10 seconds per rocker arm.


This is the carnage.  As you can see, the needle rollers go everywhere if one of the end caps decide to come out.  Catastrophe for your engine if it happens while it's running.


All out.  Excuse the shitty picture.


Difference between the new and old trunion.  The Comp Cams one is much beefier.


"Pressing" the new bearings in was a breeze.  And by "pressing" I mean hammering.  Because I don't have a press.  But don't worry, I was gentle ;).  Using a wooden block to pound the first one in flush, and then and a 15 mm socket for the second bearing worked flawlessly.  The benefit is that the new bearings are captured needle-rollers, so I don't have to worry about the needles falling out.  Also, the press fit seemed to be tighter, which also helps retain them.  Snap rings on either side of the trunion add an additional layer of security.

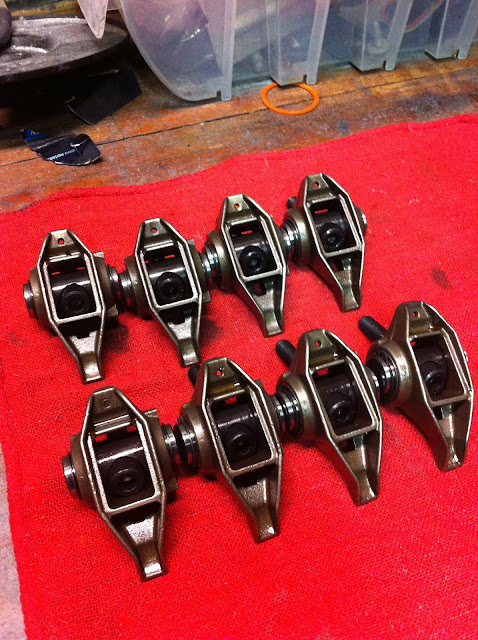
All done.  Again, another really easy and straightforward job.


 Next up will be some head porting.  Still have to finish the second valve cover but engine work is so much more fun.

And oh yeah, and Happy Halloween