A little progress tonight..
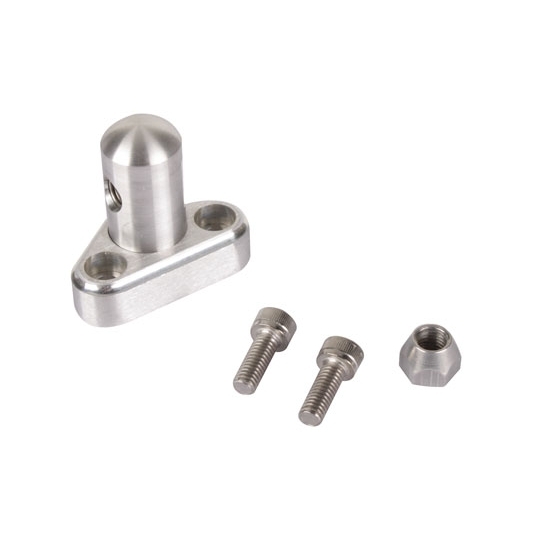
I've been amassing pieces / fittings for a steam vent crossover for the engine. 1/8" NPT to -4AN adapters that thread into adapters that bolt into the block. I have two tight spots on the front driver's and rear passenger's side that will need addressed. Not sure how best to handle it yet. The problem is exacerbated when the intake is torqued down and I don't want to risk developing cracks in the intake (plastic).
This spot on the passenger front of the block has just a straight adapter that will get a manifold block that collects all the lines individually before being sent out to the rad / expansion tank.
I intend to machine that myself, but here's a cross section of what that will look like...3 inlets and one outlet to the rad (upper right).
Also got a few more parts in. Russell fittings for my fuel filter / pump to adapt to my -AN hardlines, along with a Borgeson DD telescoping steering shaft and one of my Flaming River chromoly u-joints. I'll be building my own lower profile steering shaft to enhance header clearance and also to withstand the heat better. The stock shaft has a rubber rag joint that would be nested in the driver's side header. Waiting on the other u-joint, but will need to measure before I trim it to length.
"When we build, let us think that we build forever. Let it not be for present delight nor for present use alone. Let it be such work as our descendents will thank us for; and let us think, as we lay stone on stone, that a time is to come when those stones will be held sacred because our hands have touched them" - John Ruskin
Tuesday, January 14, 2014
Friday, January 10, 2014
Throttle Cable Bracket Mockup
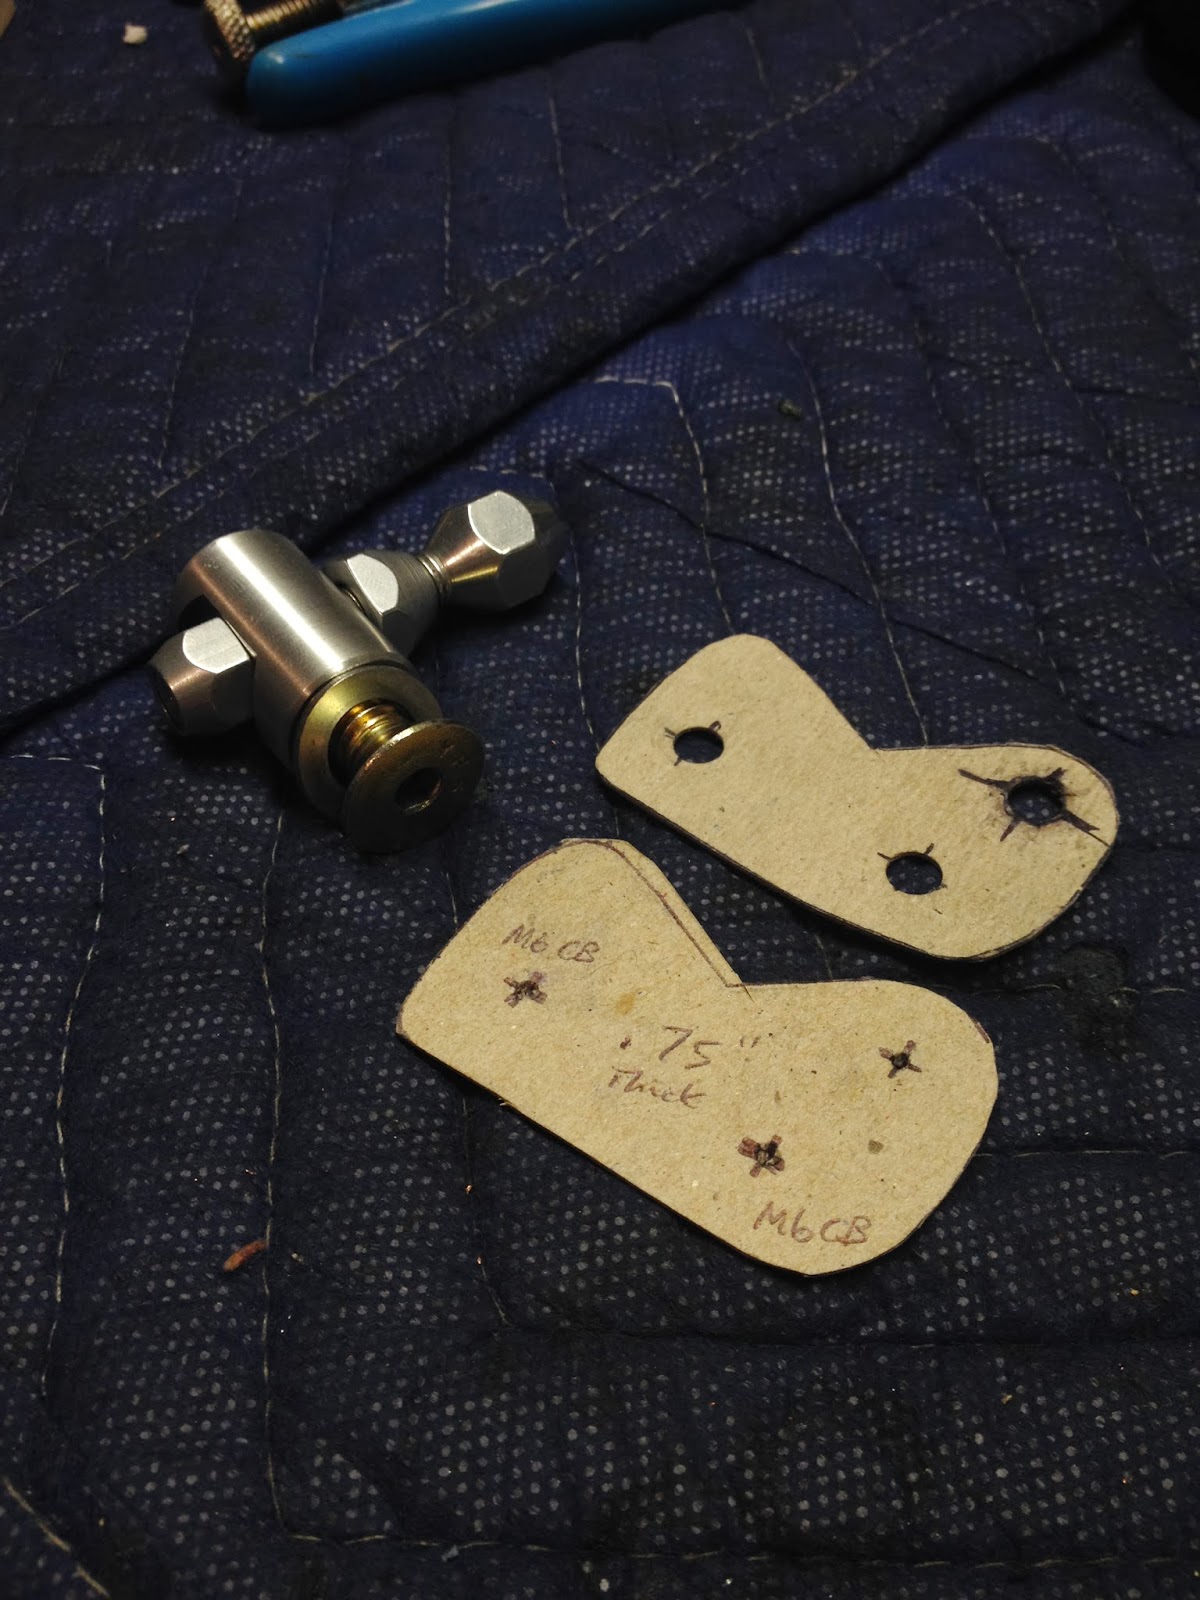
Made a little progress tonight on a throttle cable bracket.The stock F-body bracket doesn't fit the FAST 102 intake I've got, and neither does the Lokar LS1 bracket. Both have the cable entrance positioned basically where the intake port for cylinder #2 is. In addition to this, the cable position is too far inboard to be in line with the cam on the throttle body. So the whole thing needed to move up and out relative to the intake.
This is the offending subject. The post is secured with a countersunk screw from the backside, which I removed. The flat bracket portion is what I'll be replacing.
I started by taking a piece of copper wire and wrapping it around the post of the bracket, bending it up until I got it positioned where it needed to be.
Then took a tape outline of the mounting surface of the intake and transferred it to cardboard (still roughly shaped at this point).
Checking clearances - tight around whatever the fuck that tube is on the throttle body, as well as the MAP sensor on the intake.
Needs to come out from intake mounting surface by about about .750" to line up with throttle body cam.
Finished-ish shape with hole locations marked. Plan is to make it out of aluminum and powder coat it to blend in with the intake manifold. The post will be left bare aluminum (I think).
RIP Blackie - 09/1994 - 1/10/2014
It was a bittersweet kind of day - I got home from work just in time to see my old friend take one last ride. RIP Blackie. See you in the next life.
Thursday, January 9, 2014
This week has been full of fails. Allow me to enumerate them:
Damn it. Damn it all
- Ordered Milliken Race Car Dynamics book so I could learn about suspension theory and the principles that will allow me to set up my car's suspension properly. Received it the other day and realized it was the supplement with example problems and answers, not the actual book.
- The ferrule for my Lokar throttle cable doesn't work with my FAST 102 throttle body - the passages in the cam are cut such that I can't fit the cable through the back side of the ferrule when inserted in the cam slot.
- Lokar throttle cable bracket does not fit FAST 102 intake manifold. Not even close.
- Lokar dipstick I bought for LS1 engines 1999-2004 is the wrong length and would give me a "full" reading with less oil than it should.
- Speedway motors -3AN adapter for the hydraulic supply line to my T56 throwout bearing doesn't fit. The OD's of the part are too large and prevent it from seating fully.
Damn it. Damn it all
Monday, January 6, 2014
Engine Build
The Pushrod Length / Lifter Preload SagaBeen a while since my last update, but I've made some progress as of late.
Buying a cheap magnetic base indicator stand from harbor freight solved all of my preload measurement problems. You have to have this absolutely dead-nuts aligned with the "preload column" and be extremely careful with how you tighten everything down to get repeatable numbers, but I was able to confirm my expected preload numbers to within .0015" or so.
This allowed me to assume that my improvised way for measuring pushrods was not only accurate, but produced the exact preload on the engine that I was expecting. To summarize, I cobbled together a way of measuring gauge length directly with a pair of 8" calipers by gluing some small pieces of steel to the jaws that were drilled for a .140" hole. In theory, the circumference of the holes would bisect the ball-end of the pushrod at the .140" diameter (gauge length), thus negating any effect the size of the oil hole has on overall length. This is the industry standard for measurement, given that oil hole diameter varies manufacturer to manufacturer.
With that knowledge, I ordered the entire set of my pushrods to the appropriate lengths from Trend performance. I ended up a dual taper push rod, 3/8" - 5/16" fully machined 210 degree ball ends with a .135" wall. These rods are stiffer than an 11/32" rod, but lighter than a full 3/8" rod. A pretty good compromise, given that I can't fit full 3/8" rods through my heads. I needed the beefier pushrods on my build to help to ensure reliable valve motion by minimizing deflection and the "pole vaulting" effect that leads to lofting. I am not running the most aggressive lobes on my cam, but they're certainly not he mildest either.
The engineer that designed the lifters I'm using (Johnson LSR's) recommended a target preload on my lifters at .025-.030" (verified by Spintron testing) and brought about the need for verifying all of my measurements to the nth degree - tolerances can get way out of control otherwise and really add up for undesirable effects. I removed all the error I could from my measurements, and after speaking with Trend, they told me that they were able to hit 001"-.005" on custom length rods due to expansion during machining. With this knowledge, I ordered all of my pushrods based on an .030" preload. I made some exceptions when pushrod lengths were similar and ordered common lengths where I could, but all told I ended up with 9 unique lengths across all 16 valves. This way I'd be able to shim the rockers up slightly to bring my preload down if necessary if they're cut too long. All I could do was hope they didn't cut them too short.
Here's what I received. This strategy seemed to work really well, as they were able to hit their targets within a few thou. Below is a summary of my results.
Low is .023", max is 0.033". For the low one, I may machine some rocker shims to the precise thickness I need to bump up the preload slightly - there about a .010" window of forgiveness in height either direction before I start negatively affecting my wipe pattern on the valve tip. I would consider ordering another pushrod but there's no guarantee this would solve the problem, so I'll save my money. The #8 cylinder will get an additional .003" rocker shim to bring those preloads within spec (.030/.027" respectively). Some small adjustments to make, and honestly I'm not sure if they're even significant adjustments (will the lifters care?), but it should provide me with as close to an optimized setup as I can achieve.
Finish Work.
With all the intense measurement critical stuff done on the engine, now I have to do all of the "finish" detail work for the exterior. Below is the shortlist of things to get done before I can button her all the way up.
- Powder coat valve covers, oil pan, front timing cover, AC bracket, alternator bracket
- Clean up accessories and starter motor, and order belts
- Fuel injector rail clips
- Ignition wires and remote mount of ignition coils (may need to wait until the engine is in the car)
- Coolant steam port vent line build (front and rear) for cylinder heads
- Catch can and PCV system routing
- Oil cooler adapter
- Oil / coolant sensor setup. I'll be running some VDO gauges so I can keep track of oil pressure, temperature, and water temperature in real time.
- Throttle cable / cable bracket
- LS1 +04 2-piece thermostat. I bought both 180 and 160 degree thermostats, not sure which I'll use yet but I'll have the option!
- Layout and clean up wiring harness
- Base tune on PCM
Teaser shot of the engine in mockup
Chassis Integration
With all of that pretty much on hold until I gather everything up to go to powder coat, I started figuring out what I wanted to do in terms of chassis integration.
Lots to figure out...
- Fuel supply
- Power steering adaptation
- Compact steering shaft
- Clutch hydraulic integration
- Electrical and PCM wiring
- Oil cooler setup
- Cooling / heater core system integration
- Braking system
- EVAP / Emissions stuff for OBDII compliance
I'm using this space as a placeholder for my ideas / train of thought at the moment, but in case you care:
- Fuel supply
- Corvette FPR. (Filter / regulator) - regulates pressure to 58 psi.
- Rally Road HFP 300lph Fuel Pump Kit. Drops right into the stock pump location.
- Stainless hard lines
- Stainless hose from FRP to fuel rail
- -6AN fitting throughout (which means I'll need to get 37 degree flaring tools for the hardline to use AN tube nuts / sleeves). They make "hardline adapters" but they're not rated for more than 50 psi, and I'd rather not develop a fuel leak.
- Power steering adaptation
- Pretty simple - AN high pressure hose from pump to rack. Will need to TIG -AN fitting to power steering "cooler" tube.
- Compact steering shaft
- Needed to help with header clearance and help eliminate heat affect on rubber rag joint of the stock piece (no headers on drivers side originally)
- Flaming River chromoly U-joints
- Borgeson telescoping DD shaft
- Clutch hydraulic integration
- Bought some nifty adapters for the T56 TOB to adapt to standard -AN lines
- Speedbleeder (moves bleeder screw into engine bay instead of under car somewhere)
- Rally Road Tilton 7/8" MC kit. I like a firm pedal. The stock M3 master is reported to be too soft with the LS clutches.
- Electrical / Sensors / PCM wiring
- No idea on wiring pinouts yet
- Bought an SA-1000 standalone relay/fuse block
- Oil pressure sending unit adapter for stock location. The idiot "low pressure" light is useless to me, I'd rather read out on a VDO gauge and know what the pressure is at all times.
- Oil temperature - port in oil cooler adapter for that (in the pan). This will also let me know when the thermostat opens to allow oil to flow through the cooler. VDO gauge again.
- Water temperature - BMW sensor to drivers side head for gauge in dash. Another sensor on passenger side head for readout on VDO gauge.
- Oil cooler setup
- Improved racing low-profile oil cooler adapter / thermostat
- Setrab cooler and fittings (need to decide on size).
- Braided stainless lines / -AN fittings
- Cooling / heater core system integration
- No idea.
- Braking system
- Rally road kits - Corvette Z06 6-piston fronts with DBA-5000 2-pc hats, Porsche brembo rears.
- ABS will be retained
- All lines will be remade from stainless.
- EVAP / Emissions stuff for OBDII compliance
- PCV is pretty straight forward. Need to figure out exact routing and whether or not I need to use the check valve.
- EGR is deleted (tuned out)
- AIR is also deleted (tuned out)
- Cats
- Pre / post O2 sensors
- Evap line from BMW charcoal canister will be connected to LS vapor purge solenoid
- GM fuel tank sensor. Required to let the GM engine PCM control the BMW charcoal canister.
Trying to get all the details ironed out now to make the swap as straight forward as possible once I start. I'm trying to get this done by the fall, or at least driveable.
Monday, December 2, 2013
Did a little bit of work over the Thanksgiving break.
Started back up on the engine by remeasuring my pushrod length and lifter preload. I discovered that fully torquing the heads down has a significant effect on gasket thickness, and thus the required pushrod length - much more so than I was expecting. When I measured them before I only "snugged" it down tight because I was leery of what multiple torque sequences might do to the sealing ability of gaskets that are $80 a piece. But when my measurements weren't repeating with what I took last time I said f*ck it and torqued it down. In some cases my measurements changed about .030".
Anyways....onward with measuring lifter preload. When I tried this before I was having problems as I snugged the rocker pair down with the indicator tip wandering around the pushrod cup, fucking up my measurements. To try and help solve this I bought a pointed carbide indicator tip, which I ground/polished into even more of a point. This would locate it positively in the oil hole on the pushrod side of the rocker.
This helped to make my measurements much more repeatable.
Now with my pushrod lengths taken, I could test the sample push rods I got from trend and attempt to measure an expected lifter preload based on the difference between what I actually need and what I actually have. This was in an effort to more or less show that my measurements are comparable to the measurements they take at Trend. Results were all over the place, and at the moment I can't really say why. I tested the expected preloads with a 7.700 rod from Trend.
At the end of the day - I have no control over what Trend sends me. I'm going to all this trouble to minimize measurement error and quadruple check everything, and then they could send me a pushrod that's out of spec. Say 0.009" short of my spec'd length. Like they did with the 7.730 rod I ordered. Which was supposed to be cut within +/- 0.001". WTF
Am I the only one who checks this shit? Short of ordering a whole slew of slightly varied lengths to accommodate all the measurement / machining error, I really don't know if there's a bulletproof way through this.
This has been the most frustrating part of the build to date BY FAR.
While I figured out how to handle all of this, I decided to get out and practice some MIG welding in the garage. T-joints on 1/8" steel. I was disappointed to find that my little HH 140 wasn't powerful enough to really burn it in nice - the toes of the weld seemed to be pretty cold even with the machine maxed out, a reduced travel speed, short stickout, etc. So I'll be looking to source a more capable 230V machine in the near future, but figured I could get some decent practice in regardless.....at least work on hand consistency. This is about the best I could do - pulling from left to right and tracing out small "e's" with a little pause at the top of each loop. C25 gas and 0.023" wire. Might have worked better with 0.030" but this is what I had.
Like I said, the welds are cold but I beat the hell out of a few of the joints like they owed me money and nothing let go.
TIG welder coming later this week! Gotta get power run and another bottle before I actually melt stuff with it though :(
Started back up on the engine by remeasuring my pushrod length and lifter preload. I discovered that fully torquing the heads down has a significant effect on gasket thickness, and thus the required pushrod length - much more so than I was expecting. When I measured them before I only "snugged" it down tight because I was leery of what multiple torque sequences might do to the sealing ability of gaskets that are $80 a piece. But when my measurements weren't repeating with what I took last time I said f*ck it and torqued it down. In some cases my measurements changed about .030".
Anyways....onward with measuring lifter preload. When I tried this before I was having problems as I snugged the rocker pair down with the indicator tip wandering around the pushrod cup, fucking up my measurements. To try and help solve this I bought a pointed carbide indicator tip, which I ground/polished into even more of a point. This would locate it positively in the oil hole on the pushrod side of the rocker.
This helped to make my measurements much more repeatable.
Now with my pushrod lengths taken, I could test the sample push rods I got from trend and attempt to measure an expected lifter preload based on the difference between what I actually need and what I actually have. This was in an effort to more or less show that my measurements are comparable to the measurements they take at Trend. Results were all over the place, and at the moment I can't really say why. I tested the expected preloads with a 7.700 rod from Trend.
- Cyl 2 intake: Expected - .037. Measured - .038. Good.
- Cyl 4 intake: Expected - .030. Measured - .020. What.
- Cyl 6 intake: Expected - .040. Measured - .023. Wat.
- Cyl 8 intake: Expected - .022. Measured - .015. Eh.
At the end of the day - I have no control over what Trend sends me. I'm going to all this trouble to minimize measurement error and quadruple check everything, and then they could send me a pushrod that's out of spec. Say 0.009" short of my spec'd length. Like they did with the 7.730 rod I ordered. Which was supposed to be cut within +/- 0.001". WTF
Am I the only one who checks this shit? Short of ordering a whole slew of slightly varied lengths to accommodate all the measurement / machining error, I really don't know if there's a bulletproof way through this.
This has been the most frustrating part of the build to date BY FAR.
While I figured out how to handle all of this, I decided to get out and practice some MIG welding in the garage. T-joints on 1/8" steel. I was disappointed to find that my little HH 140 wasn't powerful enough to really burn it in nice - the toes of the weld seemed to be pretty cold even with the machine maxed out, a reduced travel speed, short stickout, etc. So I'll be looking to source a more capable 230V machine in the near future, but figured I could get some decent practice in regardless.....at least work on hand consistency. This is about the best I could do - pulling from left to right and tracing out small "e's" with a little pause at the top of each loop. C25 gas and 0.023" wire. Might have worked better with 0.030" but this is what I had.
Like I said, the welds are cold but I beat the hell out of a few of the joints like they owed me money and nothing let go.
TIG welder coming later this week! Gotta get power run and another bottle before I actually melt stuff with it though :(
Tuesday, November 26, 2013
The past few weeks I've been working on selling parts / reorganizing the garage and cleaning out any unnecessary junk.
I started taking the interior in the m3 apart to decide what I'm going to do with it. Either by selling it and swapping it black, or converting it black myself, the dove grey has got to go. Given that people seem to think OEM black interiors are worth $800 ON TOP OF the dove grey in a trade, I think I'm going to see what I can do with SEM products for a fraction of that cost.
The back seats aren't in bad shape, no tears or anything. Just ugly.
Front vaders and carpet aren't as good. Bolster wear / failing dye coat. I'll probably either sell the front seats as-is or convert them and sell them. I plan on autocrossing / tracking the car so would like something a bit more performance oriented and comfortable in the front.
I also decided to remove the gay-ass ricer wing that came with the car. I think the lines are much cleaner wingless and it serves no purpose at speeds below probably 120 mph (which I spend pretty much 0 time at).
With the wing off I found the trunk lid to have pretty bad gaps and be slightly bent up at the mounting locations - so I'll need to replace it with a lid that isn't fucked up and have it resprayed.
In other news, I finally pulled the trigger on a TIG welder! I've been researching / watching videos for about a year now and finally decided to make the plunge. Black friday discounts and additional promotion deals were too good to pass up. My plans for immediate use are to fab my stainless exhaust and all engine / trans mounts for my LS swap that I plan to start in the spring. In the mean time, I'll be practicing all winter.
HTP Invertig 221
Also got 2% lanthanated tungstens along with filler metal in several sizes for use on aluminum, mild steel, and stainless.
Also got a few different gas lens kits. A jumbo cup for 1/16" electrodes for use on stainless
A regular size pyrex kit with gas saver lens for use on other stuff..
And a stubby gas lens kit for reaching into harder to reach places. I envision this potentially coming in handy on header collectors. Also gives the -17 torch a bit more of a smaller -9 torch feel....a bit easier to manipulate.
Also got a dual feed flowmeter that I can attach to my tank, feeding one line to the welder and one for use as a backpurge on stainless exhaust tubing.
Really not sure exactly what the best combinations of everything will be but I wanted to give myself some room to experiment with all the different setups / applications of torch configurations - as it seems to be really application dependent on what you're welding on. Really looking forward to learning!
I started taking the interior in the m3 apart to decide what I'm going to do with it. Either by selling it and swapping it black, or converting it black myself, the dove grey has got to go. Given that people seem to think OEM black interiors are worth $800 ON TOP OF the dove grey in a trade, I think I'm going to see what I can do with SEM products for a fraction of that cost.
The back seats aren't in bad shape, no tears or anything. Just ugly.
Front vaders and carpet aren't as good. Bolster wear / failing dye coat. I'll probably either sell the front seats as-is or convert them and sell them. I plan on autocrossing / tracking the car so would like something a bit more performance oriented and comfortable in the front.
I also decided to remove the gay-ass ricer wing that came with the car. I think the lines are much cleaner wingless and it serves no purpose at speeds below probably 120 mph (which I spend pretty much 0 time at).
With the wing off I found the trunk lid to have pretty bad gaps and be slightly bent up at the mounting locations - so I'll need to replace it with a lid that isn't fucked up and have it resprayed.
In other news, I finally pulled the trigger on a TIG welder! I've been researching / watching videos for about a year now and finally decided to make the plunge. Black friday discounts and additional promotion deals were too good to pass up. My plans for immediate use are to fab my stainless exhaust and all engine / trans mounts for my LS swap that I plan to start in the spring. In the mean time, I'll be practicing all winter.
HTP Invertig 221
Also got 2% lanthanated tungstens along with filler metal in several sizes for use on aluminum, mild steel, and stainless.
Also got a few different gas lens kits. A jumbo cup for 1/16" electrodes for use on stainless
A regular size pyrex kit with gas saver lens for use on other stuff..
And a stubby gas lens kit for reaching into harder to reach places. I envision this potentially coming in handy on header collectors. Also gives the -17 torch a bit more of a smaller -9 torch feel....a bit easier to manipulate.
Also got a dual feed flowmeter that I can attach to my tank, feeding one line to the welder and one for use as a backpurge on stainless exhaust tubing.
Really not sure exactly what the best combinations of everything will be but I wanted to give myself some room to experiment with all the different setups / applications of torch configurations - as it seems to be really application dependent on what you're welding on. Really looking forward to learning!
Sunday, October 27, 2013
Had a bit of a swing in direction regarding the build.
I was looking for a second vehicle to use during the winter and came across a clean M3. Long story short I bought it and have been working on shaking it down and getting it up to snuff. It's a southern car and has never seen a winter. No rust on the car to speak of. 99 model year, 170k miles on the clock.
Since the purchase, I've been swapping all of my goodies over from my other car. But so far here's what I've gotten done in about a month's time:
Here's how it sits currently. I was out and about this weekend enjoying some of the backroads around here along with some of the beautiful fall weather. Finally got it back together after struggling with trans/clutch related things.
Still to do is replace the tie rods, motor mounts, control arms, and control arm bushings. Along with installing my coilover suspension, rear camber arms, and a rear end suspension refresh. Front wheel bearings/hubs need done too I think - the bearings sound "dry" when you spin the rotors. The car also has been throwing some codes and I'm not sure as to why that is. No vacuum leaks that I'm aware of and it runs fine. Might try replacing the gas cap and go from there.
At any rate - this is the car that will be getting the LS1. I plan on getting everything sorted and enjoy it in its current form before I start the conversion. It's been way too long since I've driven a fun car and I'm not ready to give that up again just yet.
Shortly after buying the car I came across a set of SSR Competition wheels for sale locally that appeared to be in great shape. They have gun metal powder coated centers with a polished lip, and clear powdercoat over the entire thing. They are around 18 lbs a piece and are semi-forged wheels. 18"x 9.5" et 38. I should be able to support up to 275 rubber on them, maybe even 285 depending on the particular tread. More research to do but leaning towards Michelin PSS or Nitto NT555. I have plenty of time because I can't run these without either 1) jacking the car up like a monster truck or 2) welding on fender flares.
Unrelated to the project, I was away this past week at the annual ASPE conference which was hosted in St. Paul, MN. Got a couple cool pics of the area.
I was looking for a second vehicle to use during the winter and came across a clean M3. Long story short I bought it and have been working on shaking it down and getting it up to snuff. It's a southern car and has never seen a winter. No rust on the car to speak of. 99 model year, 170k miles on the clock.
Since the purchase, I've been swapping all of my goodies over from my other car. But so far here's what I've gotten done in about a month's time:
- Fixed misc fuses / lightbulbs / wiring issues
- HID headlights / drl hookup
- Replaced fog that was missing
- New rear vent window seals
- Removed front fenders and cleaned out dirt. Also coated the backsides with an enamel to keep rust away.
- Stainless brake / clutch lines
- Short shifter
- Replaced fuel filter
- Changed engine oil and installed magnetic drain plug
- Changed diff oil
- Changed transmission oil
- Installed lightweight flywheel and the 3.2 clutch kit, new pivot pin, fork, TO bearing, pilot bearing, and rear main seal
- Replaced missing engine fan
- Motion motorsport underpanel / splitter
- New flex disc
- Transmission detent pin fix / seals
- Swapped on borla catback exhaust
- Put on my CSL's for the time being. The tires that came on the car were down to the threads.
- Bled the brakes / clutch
- New battery
- New sideskirt clips
- Removed window tint
- Installed BSW speakers (still need to do the doors).
- New spark plugs
- Coolant flush
Here's how it sits currently. I was out and about this weekend enjoying some of the backroads around here along with some of the beautiful fall weather. Finally got it back together after struggling with trans/clutch related things.
Still to do is replace the tie rods, motor mounts, control arms, and control arm bushings. Along with installing my coilover suspension, rear camber arms, and a rear end suspension refresh. Front wheel bearings/hubs need done too I think - the bearings sound "dry" when you spin the rotors. The car also has been throwing some codes and I'm not sure as to why that is. No vacuum leaks that I'm aware of and it runs fine. Might try replacing the gas cap and go from there.
At any rate - this is the car that will be getting the LS1. I plan on getting everything sorted and enjoy it in its current form before I start the conversion. It's been way too long since I've driven a fun car and I'm not ready to give that up again just yet.
Shortly after buying the car I came across a set of SSR Competition wheels for sale locally that appeared to be in great shape. They have gun metal powder coated centers with a polished lip, and clear powdercoat over the entire thing. They are around 18 lbs a piece and are semi-forged wheels. 18"x 9.5" et 38. I should be able to support up to 275 rubber on them, maybe even 285 depending on the particular tread. More research to do but leaning towards Michelin PSS or Nitto NT555. I have plenty of time because I can't run these without either 1) jacking the car up like a monster truck or 2) welding on fender flares.
Unrelated to the project, I was away this past week at the annual ASPE conference which was hosted in St. Paul, MN. Got a couple cool pics of the area.
Subscribe to:
Posts (Atom)